Are you worried that the drag sign and insert row option in Microsoft Excel not working? If yes, don’t worry. We will provide you with the result oriented solution.
Microsoft Excel is part of almost every working professional and a life saver for accounting people and nightmare for some. MS Excel can perform many operations and can be used in different manner by different people. It is said that it has become so vast that you will need to spend some good time to master it.
But let’s not digress and go back to our topic, i..e plus sign in Excel is not working right or missing ? Here’s the solution for that.
See how to make plus sign in MS Excel 2007 work or show:
1. Open Excel.
2. Go to Excel Option.
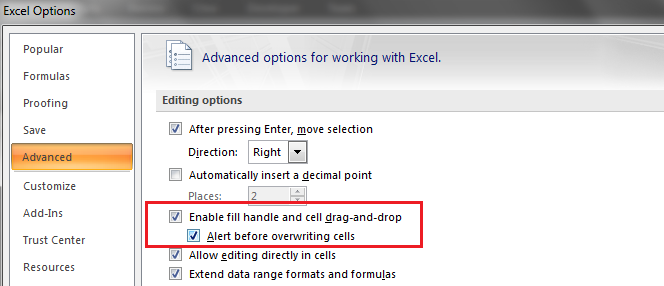
3. Select Advances from the left side options. Click on checkbox option “Enable fill handle and cell drag-and-drop”.
Below is the screenshot of the option you need to enable.

The second part of this article is if you are not able to insert row in Excel. Here is the solution
See how to enable the insert row option in MS Excel 2007:
1. Close Excel windows that are open.
2. Open Microsoft Windows Explorer, go to address bar and type : “%appdata%\Microsoft\Excel”. You can also reach here using path C:\Users\[profile name]\AppData\Roaming\Microsoft\Excel
3. Locate the file Excel15.xlb or Excel12.xlb and rename it to Excel15.old.

See how to enable the insert row option in MS Excel 2010:
1. Open Excel
2. Press [ALT]+ F11 or Go to Developer > Visual Basic menu option to open Visual Basic Editor.
3. Press [CTRL]+G to open Immediate Window.
4. Type below code in this Immediate Window
Application.CommandBars(“Row”).Controls(“Insert”).Enabled = True
Application.CommandBars(“Column”).Controls(“Insert”).Enabled = True
5. Press [ENTER] key
6. Close the Visual Basic Editor window and go back to Excel.
See how to enable the insert row option in MS Excel 2013:
1. Close all Excel windows that are open.
2. Go to Run and type regedit. This is open Windows register editor.
3. Locate \Office\15.0\Excel\Options and Delete.
Please note that the options are for Windows 7. If you are using other OS versions like Windows 10, then whole idea is same but how to reach the desired file may change.
The problem which are discussed above may occur again also, so you can repeat the steps to solve the problem.


